- Products
- New Products
- Featured Products
- Color and Print Themes
- Blood Pressure Measurement
- NIBP / Vital Sign Monitors
- Digital Aneroid Sphygmomanometers
- Palm Aneroid Sphygmomanometers
- Pocket Aneroid Sphygmomanometers
- Pro's Combo Sphygmomanometers
- Multicuff Sphygmomanometers
- Clock Aneroid Sphygmomanometers
- Mercury Sphygmomanometers
- Home Blood Pressure Measurement
- Adcuff +
- Gauges
- Bulb & Valves
- Disposable Cuffs
- Reusable Cuffs & Bladders
- Sphygmomanometer Accessories
- Sphygmomanometer Parts
- Caseware
- CPR / Airway
- EENT
- Instruments & Accessories
- Laryngoscopes
- Penlights
- Pulse Oximeters
- Stethoscopes
- Thermometry
- Vital Signs Monitors
- Solutions
- About ADC
- Learning Center
- Support
- Blog
- Contact

Quick Start Guide for the ADviewer software
The purpose of this document is to outline the setup and use of our ADviewer software. This software can ONLY be used with our ADview 9001 bluetooth units. In addition to this document you will want to familaize yourself with "Using the ADviewer software in my practice".
- Pair your ADview unit to your PC. Follow the guides below depending on the operating system you are using:Remember to take note of the outgoing COM port used during pairing.
- Download the ADviewer software from the following web address:
- Double click the 'Setup.exe'. Follow the screen prompts to install the software.
-
Once installed double click the icon on your desktop:

-
The first time you use the ADviewer software you will need to tell it which COM port it will be communicating over. To do this click the 'Settings' button in the lower left corner of the screen:

-
Using the 'Communications (COM) Port' drop down select the COM port you used to pair your ADview device. This is a one time setup. Your selection will be saved for future use. In the example above we are using COM3. Click the 'Test Connection' button to ensure the connection can be made to the unit.
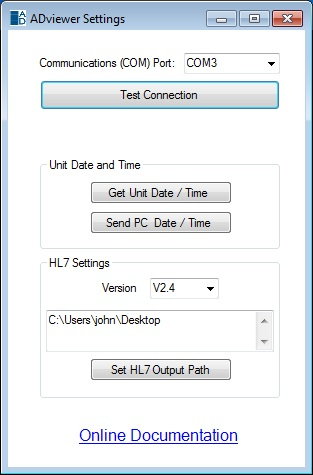
-
It is recommended that you verify the ADview system time while on this setup screen. Do this by clicking 'Get Unit Date/Time'. This will display the time stored on the unit. If this time is not correct you can send your PC Date/Time to the unit by clicking the 'Send PC Date/Time' button.
-
If you are using HL7 output you will want to configure what version you will output in (v2.4 is default) and the folder that the readings files should be stored in.
-
You are now ready to start using the ADviewer software. The software is designed for a top down workflow. The flow of operations should follow as such:
- Take your patient readings using the ADview.
- Retrieve the reading using the 'Retrieve Readings' button.
- Enter the Patient ID.
- Enter the Patient Name.
- Export OR Print the readings.
- Clear the readings.
-
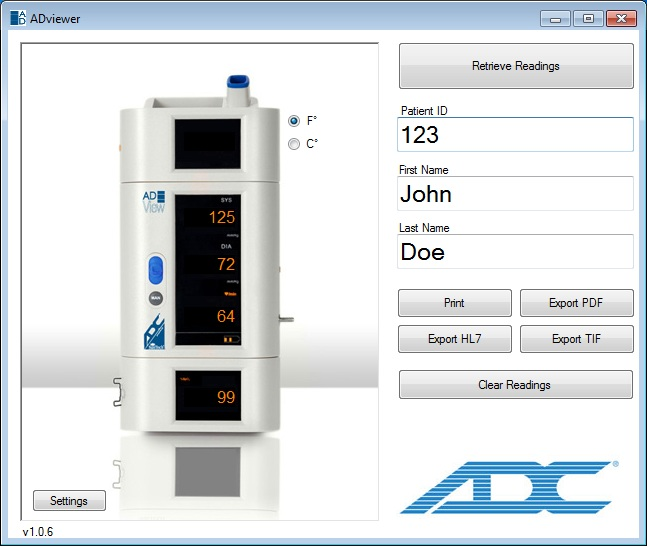
Below is an example of the ADview interface loaded with readings:
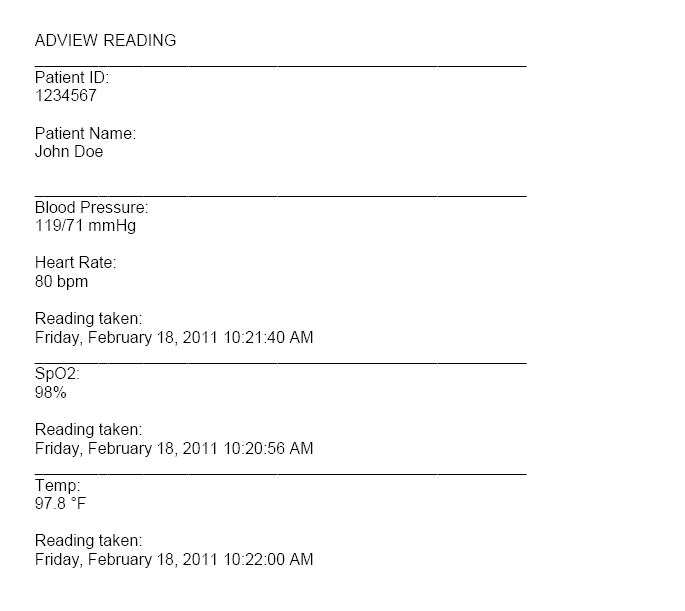
- Below is a sample printed report of an ADview reading: