- Products
- New Products
- Featured Products
- Color and Print Themes
- Blood Pressure Measurement
- NIBP / Vital Sign Monitors
- Digital Aneroid Sphygmomanometers
- Palm Aneroid Sphygmomanometers
- Pocket Aneroid Sphygmomanometers
- Pro's Combo Sphygmomanometers
- Multicuff Sphygmomanometers
- Clock Aneroid Sphygmomanometers
- Mercury Sphygmomanometers
- Home Blood Pressure Measurement
- Adcuff +
- Gauges
- Bulb & Valves
- Disposable Cuffs
- Reusable Cuffs & Bladders
- Sphygmomanometer Accessories
- Sphygmomanometer Parts
- Caseware
- CPR / Airway
- EENT
- Instruments & Accessories
- Laryngoscopes
- Penlights
- Pulse Oximeters
- Stethoscopes
- Thermometry
- Vital Signs Monitors
- Solutions
- About ADC
- Learning Center
- Support
- Blog
- Contact

How to Use an Ophthalmoscope
Proper use of an ophthalmoscope requires a bit of practice and familiarity with the functions of your device. Regardless of model type, these hand-held devices are critical in the evaluation and diagnosis of a variety of diseases in the eye.

ADC Pocket Ophthalmoscopes have five aperture selections, shown above: small spot, large spot, semicircle, red-free filter, and fixed.
Standard ADC ophthalmoscopes have a rheostatic control switch to power the light source. This control switch also allows you to control the brightness of the light manually. Our pocket ophthalmoscopes feature an on/off power control, as well as, an aperture selector with five different apertures to choose from. Both the standard and pocket versions feature a full range of lens selections, with the standard version having 24 corrective lenses and the pocket version having 19.
Before beginning an examination using your ophthalmoscope, it is important to ensure that you have a suitable location that will facilitate testing. There should be adequate space on either side of the patient to allow for positioning of the ophthalmoscope and examiner. Many tests performed with the ophthalmoscope require low light levels for best visualization of eye structures, so the room should have adequate lighting controls.

The anatomy of a healthy human eye, showing the basic structures. From National Institutes of Health.
Before examining a patient closely, a red reflex test should first be conducted. This is done using a 0 lens in a dimmed room. Holding the ophthalmoscope approximately six inches from the patient, the light source is angled approximately twenty-five degrees towards the patient’s eye to check for the reflection of the light from the retina. Absence of this reflection may indicate the presence of several disorders within the eye.
When examining the patient’s eyes directly, you must use your right hand and right eye to examine the patient’s right eye, and your left hand and left eye to examine the patient’s left eye. While performing the examination, the patient should remain still and focus their gaze on a distant object to facilitate the visualization of structures within the eye.
The optic disc should be examined first, and should become visible as you move closer to the patient. Generally, this will be when you are approximately two inches from the patient’s eye. To clearly visualize the disc, rotate the lenses until it is in focus. Hyperopic eyes will require more positive (+) lenses for proper visualization, while myopic eyes require negative (-) lenses. Special attention must be paid to the coloration, shape, elevation and the condition of the blood vessels within the optic disc when performing this evaluation.
After this examination is complete, follow the retinal arteries and examine the four vascular arcades including the superotemporal, superonasal, inferotemporal, and inferonasal. It may be helpful to have the patient look in the direction of each vascular arcade while positioning yourself slightly opposite to the eye’s movement to better visualize each arcade.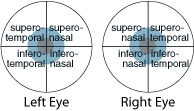
The final part of the examination involves evaluating the macula. To best visualize this portion of the eye, the patient can either look directly into the light source or the light source can be positioned temporarily approximately the distance of two optic discs. Because this can be uncomfortable for the patient, this portion of the examination should be performed last and should be kept as brief as possible to avoid over-exposing the patient to the light source.
From the Learning Center
From the Learning Center

You May Also Like
You May Also Like

From the Learning Center
From the Learning Center
